For residents of Singapore’s compact HDB flats and private apartments, space is a premium commodity. The modern cordless vacuum cleaner, a marvel of convenience, can ironically become clutter if left leaning in a corner or tucked awkwardly into a storeroom. Dyson wall mounts for the Dyson vacuum series present an elegant solution, transforming your powerful cleaning tool into a displayed, charging, and always-ready fixture. This comprehensive guide delves into every facet of Dyson wall mounts, from selection and secure installation to the specific considerations for Singaporean households, empowering you to reclaim your floor space with confidence.


V8 Wall Mount Compatible with Dyson V7 V8 Cordless Vacuum Cleaner, Docking Station Accessory
The Purpose and Advantage of a Dyson Wall Mount
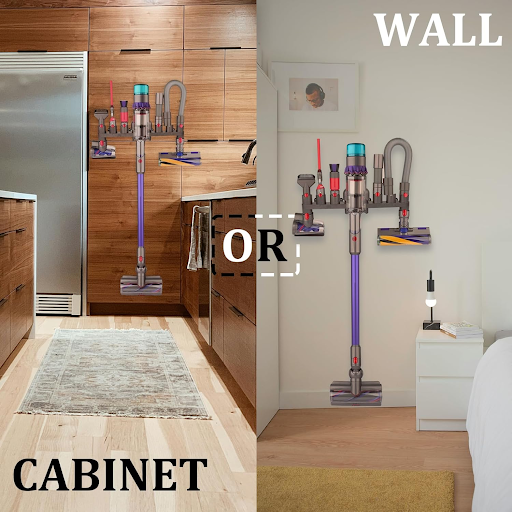
A Dyson wall mount does far more than just store your vacuum. It serves as a dedicated charging dock, ensuring your machine is always powered and prepared for spontaneous clean-ups. By mounting the vacuum and its accessories on the wall, you liberate valuable floor space, a critical benefit in our typically smaller living environments. This organized approach also protects your investment from accidental knocks and falls, while keeping all components—the main body, wand, and attachments—neatly consolidated in one easily accessible location. It turns a utilitarian object into a part of your home’s organized aesthetic.
Navigating the Dyson Vacuum Product Range and Their Specific Wall Mounts
Understanding the compatibility between your Dyson model and its corresponding mount is the first critical step. Dyson’s cordless vacuum lineup has evolved significantly, with each generation introducing subtle changes to the dock design.
Dyson V6, V7, and V8 Wall Mounts: These earlier models often share similar docking station designs. The mount typically consists of a main body dock that cradles the vacuum and a holster for the crevice tool. The process for how to install Dyson v8 wall mount is generally consistent with the V6 and V7, focusing on securing a single bracket to the wall. For those seeking clarity, the Dyson v7 wall mount instructions are a reliable reference for this group.
Dyson V10 Wall Mount: The Dyson V10 introduced a new form factor and, consequently, a new mount. The Dyson v10 wall mount is distinct and not backward-compatible with V8 or earlier models. It is designed to hold the machine in a different orientation. Paying close attention to the Dyson v10 wall mount dimensions before purchase ensures a perfect fit. The ideal Dyson v10 wall mount height balances easy docking with comfortable access to the release button.
Dyson V11, V12, and V15 Wall Mounts: These newer models feature more sophisticated docks that often include integrated cable management and a redesigned holster for the laser or fluffy nozzle. The Dyson v11 wall mount instructions will detail how to route the power cable neatly. Determining the correct Dyson v11 wall mount height is crucial, as these heavier models require a secure and ergonomic placement.
The following table provides a clear summary for quick reference:
| Dyson Model Series | Mount Type & Compatibility | Key Considerations & Use Cases |
|---|---|---|
| V6, V7, V8 | Often shared, simple bracket design. | Ideal for smaller homes; straightforward installation. The Dyson v6 wall mount is a common search for owners of these reliable, older models. |
| V10 | Unique, non-compatible mount. | Suits the V10’s linear design; requires checking Dyson v10 wall mount dimensions for a snug fit. |
| V11, V12, V15 | Advanced docks with cable management. | Best for high-use households; keeps valuable machines and their accessories perfectly organized. |
A Step-by-Step Guide on How To Install a Dyson Wall Mount
Executing a proper Dyson v8 wall mount installation or setting up a mount for any model demands precision and care. The following steps provide a universal framework for the task of how to install Dyson wall mount.
| Step | Details |
|---|---|
| Step 1: Select the Perfect Location | Identify a wall stud using a stud finder. In HDBs, concrete walls are common, but mounting into a stud offers unparalleled security. Choose a spot near a power outlet, in a dry area like a utility closet, laundry area, or an unobtrusive wall space. Ensure there is ample clearance above and below for easy docking and undocking. |
| Step 2: Gather Your Tools and Hardware | You will typically need a power drill, a hammer drill function for concrete walls, masonry bits, a screwdriver, a spirit level, a pencil, and the screws and wall plugs provided with your Dyson mount. For particularly heavy models or if you lack confidence in the supplied hardware, consider upgrading to more substantial wall anchors. |
| Step 3: Mark and Prepare the Drill Points | Hold the mounting bracket firmly against the wall in your chosen location. Use a spirit level to ensure it is perfectly horizontal. Mark the drill holes clearly with a pencil. If you are not drilling into a stud, insert the provided wall plugs by tapping them gently with a hammer until they sit flush with the wall surface. |
| Step 4: Drill and Secure the Bracket | Select a drill bit that matches the size of your wall plugs. Drill straight into the wall at your marked points to the required depth. Align the bracket with the holes and drive the screws through the bracket and into the wall plugs or stud. Tighten the screws firmly, but avoid over-tightening which can strip the holes. |
| Step 5: Attach the Charger and Dock the Vacuum | For models where the charger is separate, you now must learn how to install Dyson charger from wall mount. It usually clips or screws onto the main bracket. Finally, route the power cable neatly, plug it in, and test the setup by docking your vacuum cleaner to ensure it clicks securely into place. |
Need a secure, damage-free Dyson wall mount installation in your HDB flat? FixFirst’s certified handymen use professional tools and HDB-compliant techniques to ensure your mount is level, stable, and properly charged
Best Practices for Positioning and Potential Installation Issues
Strategic positioning goes beyond mere convenience. The ideal Dyson v8 wall mount height allows you to dock the vacuum without straining or lifting it excessively. A common recommendation is to position the base of the mount approximately 48 to 52 inches (120 to 130 cm) from the floor, but always test this with your own posture and arm length. Avoid areas with high humidity, like outside a bathroom, or places with direct sunlight, which can degrade the battery over time.
A key challenge in Singaporean HDBs involves navigating the HDB’s strict renovation guidelines. Drilling into structural beams or certain walls is prohibited. Furthermore, our walls often conceal electrical wiring and water pipes. Hitting a water pipe while drilling can lead to a domestic crisis, necessitating immediate professional plumbing services. A miscalculation can result in a faulty installation, damage to your vacuum, or worse, damage to your property. For those seeking a screw-free solution, options for a Dyson wall mount without screws do exist, typically using heavy-duty adhesive tapes. However, their reliability on the textured paint common in HDBs is questionable, and they pose a significant risk of failing, especially with heavier models like the V11 or V15.
Why Choose a FixFirst Handyman To Install Your Dyson Wall Mount
While a DIY approach may seem straightforward, entrusting the job to a professional from FixFirst eliminates risk and guarantees a superior outcome. Our expertise extends beyond simply putting a bracket on a wall.
✔️ Adherence to HDB Regulations: Our handymen are thoroughly versed in the HDB guidelines for drilling and renovation works. We ensure your installation is fully compliant, avoiding any potential issues with housing regulations.
✔️ Precision and Safety: We use professional-grade stud finders and can expertly avoid hidden electrical conduits and, critically, water pipes. This knowledge is indispensable and directly prevents the need for costly repairs.
✔️ Optimal Placement Consulting: We help you determine the most ergonomic and practical location for your mount, considering your home’s layout and power source accessibility.
✔️ Robust and Secure Installation: We employ the correct hardware for your specific wall type—be it plasterboard, concrete, or tile—ensuring your valuable Dyson unit is held securely and will not come loose over time.
✔️ Time and Hassle Savings: We bring all the necessary tools and expertise, completing the job quickly, cleanly, and efficiently, saving you the time and frustration of a DIY project.

Frequently Asked Questions (FAQs) on Dyson Wall Mounts
No, the Dyson V10 wall mount is specifically designed for the V10’s body shape and is not compatible with the V8 or earlier models.
The process varies by model. Usually, the charger is held by a simple clip mechanism or a small screw. Gently inspect the connection point; for clip-on types, pressing a tab or carefully prying it loose will work. For screw-types, a small screwdriver is needed.
While personal preference applies, a Dyson v11 wall mount height of around 130-140 cm from the floor to the base of the mount is often recommended for comfortable docking and undocking.
The included hardware is often sufficient for stud mounting. For concrete HDB walls, we strongly recommend using higher-quality, heavy-duty wall anchors to support the weight and dynamic load of removing and replacing the vacuum.
Yes, solutions for a Dyson wall mount without screws using industrial adhesive tapes exist. However, we advise against them for heavier models and on HDB wall surfaces, as the risk of the mount detaching and damaging your vacuum is high.
If the mount is loose, the wall plugs may have failed. You will need to remove the mount, fill the old holes with a wall filler, and re-install it in a new location or using larger, more secure wall anchors.
Yes, but it requires special care. You must use a diamond-tipped drill bit to drill through the tile without cracking it, then switch to a masonry bit for the wall behind. A professional handyman is best suited for this task.
You can purchase them directly from Dyson’s official stores, their website, or authorized retailers like Courts, Harvey Norman, or Best Denki.
A Dyson wall mount is a simple yet transformative addition to any Singapore home, promoting order and ensuring your cleaning tool is perpetually ready for action. While the process of how to mount Dyson v8 on wall may seem simple, the nuances of HDB walls and the value of your appliance warrant a professional touch. Don’t leave the security of your investment to chance or risk damaging your home with an errant drill hole.
Contact FixFirst today to schedule your Dyson wall mount installation. Our skilled, reliable handymen will deliver a flawless, secure, and perfectly positioned setup, giving you complete peace of mind and a beautifully organized home.