The pursuit of pristine audio quality in Singaporean homes has never been more prevalent. From content creators in BTO studies to podcasters in repurposed bedrooms, the challenge remains consistent: achieving professional sound in a space-constrained environment. Desk-mounted booms consume valuable real estate, and floor stands become trip hazards in compact HDB layouts. The solution, increasingly adopted by audiophiles and professionals alike, is a dedicated microphone holder wall mount. This comprehensive guide delves into the intricacies of selecting and installing these systems, ensuring your Singaporean home studio achieves both acoustic excellence and spatial efficiency.

The Acoustic and Spatial Advantages of a Wall-Mounted Solution
Mounting a microphone to the wall is a strategic decision that enhances both audio capture and room functionality. A microphone holder wall mount eliminates the transfer of vibrations and bumps from the desk directly to the mic, a common issue with desk-mounted arms that can introduce unwanted low-frequency rumble and handling noise into recordings. By fixing the microphone in a permanent, optimal position, users maintain consistent microphone technique, which is crucial for uniform audio quality across different recording sessions. Furthermore, this approach liberates the entire desk surface, allowing for cleaner workspace management, unobstructed movement, and a more organized environment, a critical advantage in the typically modest dimensions of Singaporean homes.
Selecting the Perfect Mount: A Buyer’s Guide for Singaporean Users
Choosing the right mounting system requires careful consideration of several factors to ensure compatibility, stability, and longevity. The primary decision revolves around the type of microphone and its weight. A heavy dynamic broadcast mic, like the Shure SM7B, demands a fundamentally different support system than a lightweight condenser microphone. The mount’s specified weight capacity must exceed the combined weight of your microphone, its shock mount, and any additional cables it must support; exceeding this limit risks a catastrophic failure.
The material and build quality of the arm itself are important. Seek out arms constructed from reinforced steel or high-density aluminium alloys, as these materials resist the sagging and drooping that can plague cheaper, plastic-heavy models over time. The internal spring mechanism should feel smooth and offer sufficient tension to hold the microphone steady in its extended position without requiring constant re-tightening.
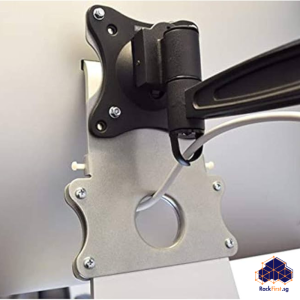
Finally, consider the interface points. The mount must connect securely to both your wall and your microphone. Most professional microphones use a standard thread, but verifying this compatibility is essential. The wall plate should be substantial, with multiple pre-drilled holes to allow for a secure attachment to wall studs or reliable anchors.
Understanding Wall-Mounted Mic Boom Arm Types and Their Applications
The market offers a variety of boom arm designs, each tailored to specific use cases and user requirements. Understanding the core differences between these types is the first step toward making an informed purchase.
Fixed-position booms are the most straightforward option. They consist of a solid arm that extends a fixed distance from the wall and cannot be adjusted. Their strength lies in their absolute stability and simplicity. They are perfect for permanent setups where the user will always be in the same position, such as a dedicated podcasting chair or a standing recording station. However, they lack flexibility, making them unsuitable for shared spaces or multi-purpose rooms.
Articulating boom arms feature multiple joints and hinges, allowing for a significant range of motion. Users can swing the microphone toward or away from themselves, adjust the height, and change the angle with precision. This flexibility makes them ideal for dynamic recording environments, such as a streamer who needs to move the mic aside frequently or a musician who records different instruments in the same space. The trade-off is a potential for slightly reduced stability compared to a fixed arm, and a higher price point.
A third category, the low-profile scissor arm, offers a middle ground. It extends and retracts in a straight line, perfect for positioning a microphone directly in front of the user with minimal lateral movement. These are excellent for setups where the microphone needs to be stored flush against the wall when not in use, maximizing space savings.
| Boom Arm Type | Ideal Use Case | Pros | Cons |
|---|---|---|---|
| Fixed-Position Boom | Dedicated podcast stations, permanent standing desks. | Maximum stability, simple design, often more affordable. | Zero flexibility, cannot be adjusted for different users. |
| Articulating Boom Arm | Dynamic streamers, multi-user setups, musicians. | Excellent range of motion, highly adjustable, versatile. | Can be less stable, more complex, higher cost. |
| Scissor Arm | Space-constrained setups, neat and tidy storage. | Retracts flush to wall, good for straight-on positioning. | Limited range of lateral movement. |
The Installation Process: Mounting Your Wall Mount Mic Boom Arm
Installing a heavy, functional piece of equipment like a wall mount mic boom arm requires precision and an understanding of your wall’s composition. A methodical approach ensures a secure and safe installation.
| Step | Details |
|---|---|
| Step 1: Identify the Perfect Location | Consider your seated or standing position, the cable routing to your audio interface, and potential obstacles. Hold the mount’s wall plate against the wall and mark the desired height and position. |
| Step 2: Locate Studs and Check for Hazards | Use a stud finder to locate the wooden or metal studs behind your drywall. Mounting directly into a stud provides the strongest possible hold. Simultaneously, use a cable and pipe detector to make sure that your chosen spot is free of electrical wiring and water pipes. |
| Step 3: Prepare the Wall Plate | Hold the wall plate level against the wall, centered on the stud. Use a spirit level to ensure it is perfectly horizontal. Mark the drilling points through the holes in the plate onto the wall. |
| Step 4: Drill Pilot Holes | Select a drill bit slightly smaller than the diameter of your mounting screws. Drill pilot holes at the marked points to a depth slightly longer than your screws. This step is crucial for preventing the wood from splitting and ensuring a tight fit. |
| Step 5: Secure the Wall Plate | Align the wall plate with the pilot holes and drive the supplied screws through the plate and into the stud. Tighten them firmly until the plate is immovable and does not wiggle under pressure. |
| Step 6: Attach the Boom Arm | Following the manufacturer’s instructions, connect the boom arm to the securely mounted wall plate. This usually involves threading it onto a bolt or securing it with a large locking nut. |
| Step 7: Load and Cable Management | Attach your microphone and its shock mount to the end of the boom arm. Route the XLR cable along the arm, using zip ties or Velcro straps to keep it tidy and prevent it from snagging on the arm’s movement. |
Need a secure, damage-free microphone boom arm installation in your HDB home studio? FixFirst’s certified handymen use professional tools and HDB-compliant techniques to ensure your mount is rock-solid
Navigating HDB Regulations and Common Installation Challenges
Installing equipment in an HDB flat requires mindfulness of specific rules. The Housing & Development Board’s renovation guidelines generally permit drilling into walls for fixtures. However, strict prohibitions exist against drilling into structural walls, especially bomb shelter walls, due to safety concerns. The greater challenge often lies in the practicalities of the installation itself.
The most significant risk is drilling into concealed electrical conduits or plumbing, which can lead to severe damage and safety hazards. Furthermore, many older HDB walls may not have studs placed at convenient intervals, or they might be made of harder materials like reinforced concrete, which requires specific drills and anchors. Mounting a heavy, levered object like a boom arm onto drywall alone, using only hollow-wall anchors, is a recipe for failure. The constant torque and weight will eventually pull the anchors loose, damaging the wall and your equipment. A professional assessment is often necessary to identify the correct mounting method for your specific wall type.
Why Choose a FixFirst Handyman To Install Your Wall-Mounted Mic Boom Arm
Attempting a DIY installation for a heavy, precision item like a microphone boom arm carries significant risk. Engaging a FixFirst technician provides assurance and a flawless result.
✔️Expert Knowledge of HDB Structures: Our handymen understand the construction of Singaporean homes. We know how to locate studs reliably and identify safe drilling zones in compliance with HDB regulations, avoiding structural and hazardous areas.
✔️Professional-Grade Equipment: We use high-torque drills, masonry bits for concrete walls, and stud-finding and cable-detection technology. This ensures a clean, safe installation without the guesswork or danger of hitting hidden utilities.
✔️Guaranteed Load-Bearing Security: We assess your wall type and use the appropriate heavy-duty anchors or direct-to-stud mounting methods. This guarantees your expensive microphone and arm will remain securely in place, no matter how much it is adjusted.
✔️Precision and Aesthetics: We ensure your boom arm is mounted perfectly level and at the optimal height for your ergonomics. We can also advise on and implement clean cable management solutions for a professional, tidy finish.
✔️Time and Risk Mitigation: We complete the job quickly and cleanly, saving you the time and frustration of purchasing tools, researching methods, and potentially making costly mistakes. Our work is guaranteed, giving you complete peace of mind.

Frequently Asked Questions (FAQs) - Microphone Holder Wall Mount Singapore
Weight capacity varies significantly. Light-duty arms may support 1-2 kg, while heavy-duty models designed for broadcast mics can hold 5 kg or more. Always check the manufacturer’s specifications and ensure it can handle your microphone, shock mount, and cable combined.
Yes, but with caution. Partition walls are often just drywall. Mounting a heavy boom arm requires special hollow-wall anchors (like toggle bolts) designed to distribute weight across a larger area of the drywall. For the safest result, professional installation is advised.
No. The vibration from drilling is temporary and localized. It will not affect the acoustic properties of your room or damage other properly installed fixtures.
Reach varies by model. A standard articulating arm typically extends between 80 cm to 120 cm from the wall, providing ample range for most desktop and seating arrangements.
Absolutely. It requires a diamond-tipped drill bit to penetrate the tile without cracking it. Once through the tile, a standard masonry bit is used for the wall behind. This is a specialized task best handled by a professional to avoid costly tile damage.
For concrete walls, high-quality sleeve anchors or wedge anchors are necessary. These anchors expand inside the concrete to create a very strong, permanent hold capable of supporting the significant leverage of a loaded boom arm.
It is possible, but not recommended by most manufacturers. Painting can affect the movement of the joints, leave a sticky residue, and void the product’s warranty. It is better to choose a finish (black, white, silver) that complements your existing decor.
Use flexible loom tubing or adhesive-backed cable clips to secure the XLR cable along the length of the boom arm. Leave a little slack at each joint to allow for full articulation without pulling the cable taut.
Most arms have tension adjustment knobs at each joint. Refer to the user manual for specific instructions on how to tighten these. If the wall plate itself is loose, the screws may need to be tightened or better anchors may be required.
While we remain brand-neutral, well-regarded brands in the industry include Rode, Blue, and Heil Sound for their build quality and reliability. The choice ultimately depends on your budget, microphone weight, and desired features.
The boom arm is the structural support that holds the microphone in position. A shock mount is a cradle that attaches to the end of the boom arm; its purpose is to isolate the microphone from vibrations and handling noise using elastic bands or suspension systems.
Yes, there are dual-arm setups available, or a single heavy-duty arm can sometimes be fitted with an adapter to hold two shock mounts. This requires careful planning to ensure the wall mount and arm can handle the doubled weight and torque.
While not as reliable, you can try tapping the wall and listening for a solid sound (indicating a stud) versus a hollow sound. Electrical outlets are usually mounted to the side of a stud, so you can measure 16 or 24 inches from the center of an outlet to find the next one. For a critical installation, investing in or renting a stud finder is highly recommended.
Yes, this is a very common and effective placement. It keeps the microphone within easy reach and saves desk space. Ensure it is mounted high enough to clear your head when standing and that the arm can articulate to the perfect speaking position.
We typically schedule appointments within a few days of enquiry. Lead time can vary based on current booking volume, but we strive to accommodate our customers as quickly as possible.
Yes, your presence is required to confirm the exact placement and height of the mount before installation begins. This ensures the final setup meets your exact ergonomic needs.
Drilling into concrete can generate some dust. Our professionals use techniques to minimize this, such as using a vacuum attachment near the drill bit. We also lay down drop cloths to protect your flooring and furniture and clean up thoroughly after the job is complete.
Removal will leave the screw holes in the wall. While the holes are relatively small, they will require patching and touching up with paint to restore the wall to its original condition. We can provide advice on this process.
Do not use them if they appear inadequate. It is common and advisable to replace supplied hardware with higher-grade screws (e.g., thicker gauge, higher tensile strength) and appropriate heavy-duty wall anchors to ensure a secure installation, especially in concrete walls.
Most models feature a large tension adjustment knob where the arm meets the wall plate. Turning this knob clockwise typically increases tension, preventing the arm from sagging under the weight of the microphone. Some models may have additional knobs at other joints.
A properly installed microphone holder wall mount is more than a convenience; it is the foundation of a professional-grade audio setup that maximizes your space and enhances your recording quality. While the allure of DIY is understandable, the complexities of HDB walls and the critical need for absolute stability make professional installation a wise investment. Protect your equipment and your home by trusting the experts. Contact FixFirst today to schedule your installation and build the studio of your dreams on a foundation of perfect execution.