In the compact and meticulously designed bathrooms of Singaporean HDB flats, every square centimetre counts. Countertop clutter, from toiletries to shaving kits, can disrupt the sense of order and tranquillity we strive for. A simple yet profoundly effective solution exists: the humble Gillette razor wall mount. This guide provides a thorough examination of these organizational tools, offering Singaporean homeowners everything they need to know about selecting, installing, and benefiting from a wall-mounted shaver holder, with a special focus on navigating HDB regulations and the value of professional installation.
The Purpose and Benefits of a Dedicated Razor Holder
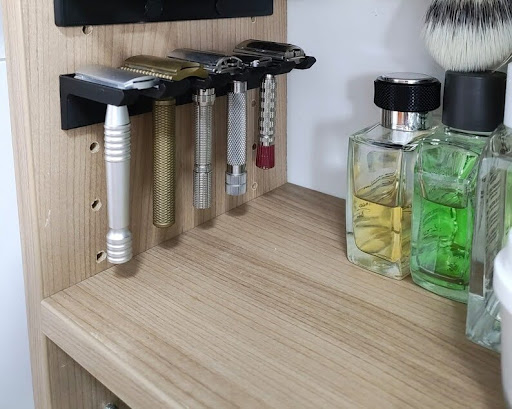
Installing a dedicated holder for your shaving tool is a commitment to bathroom efficiency and hygiene. A Gillette razor wall mount secures your often wet razor in an accessible, aerated space, allowing it to dry completely between uses. This practice significantly reduces the accumulation of moisture, which in turn discourages the growth of bacteria and mildew on the razor head, promoting better skin health. Furthermore, by moving the razor off the sink ledge, you eliminate the risk of it being knocked into the basin or onto the floor, protecting your investment and preventing potential damage to the razor itself. For families, a wall mount provides a consistent, safe spot for everyone’s razor, streamlining the morning routine and contributing to a consistently tidy bathroom environment.
Navigating the Selection: Choosing the Right Wall Mount for Your Needs
Not all razor holders are created equal, and the right choice depends heavily on your specific razor model, bathroom layout, and personal aesthetic preferences. The primary consideration must be compatibility. Gillette razors, such as the Fusion5, ProGlide, or SkinGuard, have distinct handle designs and cartridge shapes. While many generic mounts advertise universal fit, seeking out a model specifically designed for or proven to work with your razor series ensures a snug, secure hold that will not loosen over time.
The material composition of the mount is another critical factor. Look for options crafted from high-quality, waterproof plastics, ABS materials, or stainless steel. These substances resist the constant humidity of a Singaporean bathroom, preventing rust, corrosion, and material degradation. The finish should also be considered; a gloss finish may show water spots more readily than a matte texture.
Finally, assess the installation mechanism. Adhesive-backed mounts offer a drill-free solution that appeals to many renters or those hesitant to make permanent changes. However, for a truly permanent and fail-safe installation, especially for heavier razor models, a screw-fixed mount is vastly superior. Its stability is unmatched, offering peace of mind that your razor will remain securely in place.

An Overview of Common Wall-Mounted Shaver Holder Types
The market presents two predominant categories of shaver holders, each with distinct advantages and ideal use cases. Understanding their core differences will guide you to the perfect choice for your home.
Adhesive-backed holders employ a powerful, waterproof double-sided tape for attachment. Their greatest appeal lies in the simplicity of installation; they require no tools, no drilling, and leave no marks upon removal. This makes them an excellent temporary solution or ideal for those living in rented properties where alterations are restricted. Their performance is heavily dependent on surface preparation. The wall must be perfectly clean, dry, and smooth. Any texture, grease, or moisture will compromise the adhesive bond, leading to failure. These holders are generally best suited for lighter razor models.
Screw-fixed holders, by contrast, provide a definitive and robust mounting solution. They are affixed to the wall using screws and, often, plastic wall plugs for a secure anchor in the masonry. This method guarantees a permanent hold, capable of supporting virtually any razor on the market without fear of it falling. The trade-off is the requirement to drill into the wall tile or surface, a process that demands precision, the correct tools, and an understanding of what lies behind the wall surface. For homeowners in HDB flats, this is the recommended choice for long-term reliability and safety.
| Holder Type | Ideal Use Case | Pros | Cons |
|---|---|---|---|
| Adhesive-Backed | Renters, temporary setups, light razors, perfectly smooth tiles. | No drilling, easy install, removable without damage. | Less reliable, requires perfect surface, can fail in humidity. |
| Screw-Fixed | Homeowners, HDB bathrooms, heavy razors, permanent solutions. | Extremely secure, durable, long-lasting, reliable. | Requires drilling, needs tools and skill, permanent alteration. |
A Step-by-Step Guide to Mounting
For those opting for the security of a screw-fixed Gillette razor wall mount, proper installation is paramount. The process demands care and precision, particularly when working with expensive bathroom tiles.
| Step | Details |
|---|---|
| Step 1: Gather the Necessary Tools | Gather the necessary tools: a quality electric drill, a diamond-tipped or carbide glass and tile drill bit slightly smaller than your wall plugs, a masonry drill bit for the wall behind the tile, a spirit level, a pencil, masking tape, and the mount itself with its provided screws and wall plugs. |
| Step 2: Mark the Position | Determine the optimal position for your mount. Consider the height. It should be within easy reach but high enough to avoid splashing from the sink. Use the spirit level to mark a perfectly horizontal guide. Place a small piece of masking tape over the mark where you intend to drill; this helps prevent the drill bit from skidding on the hard, glossy tile surface. |
| Step 3: Drill Through the Tile | The drilling process requires a steady hand. Start drilling at a low speed without the hammer function engaged to slowly and carefully score through the glazed surface of the tile. Once you have penetrated the tile, you can increase the speed and, if drilling into masonry, engage the hammer action to complete the hole to the required depth. Clear the hole of any dust. |
| Step 4: Insert Plug & Secure Mount | Insert the provided wall plug into the clean hole. Align the mount over the hole and drive the screw through the fixture and into the wall plug. Tighten it firmly but avoid over-tightening, which could crack the tile. Finally, give the mount a gentle tug to confirm it is immovably secure before placing your razor into its new home. |
Need a secure, crack-free razor holder installation in your HDB bathroom? FixFirst’s certified handymen use professional tools and HDB-compliant techniques to install fixtures on tiles without damage
Critical Considerations: HDB Guidelines and Potential Installation Issues
Installing anything in an HDB bathroom requires mindfulness of the rules and the hidden complexities within the walls. The Housing & Development Board provides clear renovation guidelines that homeowners must follow. Crucially, drilling into structural elements, especially the bathroom bomb shelter wall, is typically prohibited. Furthermore, one must be acutely aware of concealed electrical conduits and water pipes that may run within the walls. Drilling into these can lead to catastrophic and expensive damage, posing serious safety risks.
The physical challenge of drilling into bathroom tiles should not be underestimated. Tiles are incredibly hard and brittle. Using the wrong drill bit, excessive force, or high speed can easily cause the tile to crack or shatter, necessitating a costly replacement. Without the proper experience and tools, a simple DIY project can quickly become a homeowner’s nightmare. This inherent risk is a primary reason many Singaporeans choose to engage a professional handyman service for such precise tasks.
Why Choose a FixFirst Handyman To Install Your Wall-Mounted Shaver Holder
Engaging an expert from FixFirst transforms the installation from a precarious DIY task into a guaranteed success. Our technicians bring a level of skill and assurance that DIY cannot match.
✔️Expertise in HDB Compliance: Our handymen possess an intimate understanding of HDB drilling guidelines and restrictions. We ensure every installation is performed in full compliance, avoiding prohibited areas and protecting your home’s integrity.
✔️Precision and the Right Tools: We arrive equipped with industrial-grade drills, specialist diamond-tipped bits designed for Singaporean tiles, and pipe-and-wire detectors. This technology allows us to locate and avoid hidden hazards behind your walls, preventing accidental damage to electrical and plumbing systems.
✔️Flawless Execution: Our experience guarantees a clean, level, and perfectly secure installation. We know exactly how much pressure to apply to drill through tile without causing cracks, ensuring a pristine finish with no damage to your bathroom surfaces.
✔️Time and Hassle Savings: You avoid the time spent researching, purchasing tools, and the stress of potential mistakes. We handle the entire process quickly, cleanly, and efficiently, giving you back your weekend.
✔️Lasting Security and Peace of Mind: Most importantly, our work comes with a guarantee. You can trust that your Gillette razor wall mount will hold fast, securing your razor safely for years to come.

Frequently Asked Questions (FAQs) about Wall-Mounted Razor Holders in Singapore Homes
Most Gillette razor wall mounts are designed with a universal grip mechanism that accommodates popular models like the Fusion5, ProGlide, and SkinGuard. The holder typically clasps the narrower neck of the razor handle just below the cartridge. It is always advisable to check the product specifications or packaging of the mount to confirm compatibility with your specific model before purchase.
While modern adhesive tapes are strong, their holding power on slick bathroom tiles can be compromised by humidity and temperature changes. For a heavier razor model, a screw-fixed mount is unequivocally the more reliable and safer option. Adhesive mounts are best suited for lighter razors and temporary installations.
Thoroughly clean the chosen spot on the tile with isopropyl alcohol or a high-proof spirit and a clean, lint-free cloth. This will remove all invisible residues of soap, oil, moisturizer, and water minerals. Ensure the surface is completely bone-dry before applying the adhesive mount.
The ideal height is typically between 110 cm and 130 cm from the floor. This places it comfortably within reach above the sink counter, preventing water splashes from the basin while making it easily accessible for most adults. Consider the primary user’s height for ultimate convenience.
You can, but it is not ideal. The constant exposure to direct steam and hot water from the shower can accelerate corrosion on metal components and promote mildew growth. The best location is on a wall near the sink, away from the direct spray of the shower.
HDB guidelines generally allow minor drilling into non-structural walls for fixtures like razor holders. The critical rule is the strict prohibition against drilling into the structural bomb shelter wall. It is always prudent to consult the HDB renovation guidelines or engage a professional who understands these regulations.
This can lead to severe consequences, including flooding from a punctured water pipe or an electrical short circuit and potential electrocution hazard from a damaged wire. Repairing this damage is extremely costly and disruptive. This risk underscores the importance of using a professional-grade pipe and wire detector before any drilling commences.
Yes, a professional can install a mount on textured or painted walls. The process may require different drill bits (e.g., a masonry bit for solid walls) and specific anchors designed for that wall material to ensure a secure hold. The surface must be stable and solid.
A properly installed screw-fixed mount, using the correct wall anchors drilled into a solid substrate (tile and wall), can typically hold between 5 to 10 kilograms. This is far more than sufficient for any razor, but the primary strength is against the pulling force (leverage) rather than just the sheer weight.
While drilling itself doesn’t require turning off the main water supply, it is a highly recommended safety precaution. If you were to accidentally drill into a pressurized water pipe, the resulting leak would be immediate and significant. Turning off the water mitigates this risk entirely.
The cost for professional installation of a single razor holder typically ranges from $40 to $80. This price can vary based on the wall material, the complexity of the installation (e.g., detecting pipes), and whether you require the installation of multiple holders. FixFirst service rates, however, are some of the cheapest in Singapore. Just Whatsapp us for a quote.
You will almost certainly need a new one. Once the adhesive strip has been compressed and then pulled away from the surface, its bonding strength is significantly weakened. Reusing it will almost guarantee another failure.
For a skilled handyman, the entire process—from locating studs, detecting wires, drilling, and mounting—for a single holder typically takes between 15 to 30 minutes.
Yes, professional handyman services are equipped with diamond-tipped drill bits specifically designed to drill through hard materials like granite or marble without cracking them. This is a specialized task that should not be attempted with standard drill bits.
Drilling for a small fixture like a razor mount on a non-structural wall is considered a minor alteration and will not void your HDB bathroom warranty. The warranty is primarily voided by unauthorized structural changes, plumbing, or electrical alterations.
Use dental floss or a fine fishing line to slowly saw through the adhesive strip behind the mount. Once the mount is removed, any residual adhesive can be gently rubbed off with your finger, a soft plastic scraper, or a cloth dampened with a mild solvent like goo gone or isopropyl alcohol.
Absolutely. A professional can install multiple holders at varying heights or in a neat row, ensuring each one is level and securely mounted to accommodate every family member’s preference.
Typically, clients purchase the specific Gillette razor wall mount or holder of their choice to ensure it matches their razor and aesthetic preference. The handyman service then provides the expertise, tools, and hardware for a secure installation. Some services may offer to procure it for you, so it’s best to ask when booking.
A professional handyman will assess this and have a variety of screw sizes on hand. They can trim a screw that is too long to the perfect length or replace it with a shorter, appropriately sized screw that will secure the mount without penetrating too deeply into the wall cavity.
For a screw-fixed mount, you can place your razor on it immediately after installation. For an adhesive mount, you must carefully follow the manufacturer’s instructions, which usually require applying pressure for 30 seconds and then waiting 24 to 72 hours for the adhesive bond to fully cure before applying any weight to it.
A Gillette razor wall mount is a small upgrade that delivers significant dividends in bathroom organization, hygiene, and daily convenience. While the DIY route is tempting, the risks associated with drilling in an HDB bathroom—from violating guidelines to causing costly damage—are substantial. By entrusting this precise task to the skilled professionals at FixFirst, you invest in a flawless, secure, and compliant installation that protects your home and your possessions. Do not leave the functionality and safety of your bathroom to chance. Contact FixFirst today to schedule your expert handyman service and transform your bathroom into a model of efficiency and order.