The pursuit of a spacious, modern, and effortlessly clean bathroom leads many Singapore homeowners to a compelling solution: the wall mounted basin. This elegant fixture, which appears to float serenely above the floor, does more than just save space. It introduces a sleek, contemporary aesthetic that transforms the entire feel of a bathroom. For HDB dwellers, where every square foot counts, the appeal is particularly strong. This guide delves into every facet of selecting, installing, and maintaining a wall mounted basin in the unique context of Singapore homes, empowering you to make an informed decision for your next renovation.
Understanding the Importance of the Wall-Mounted Basin
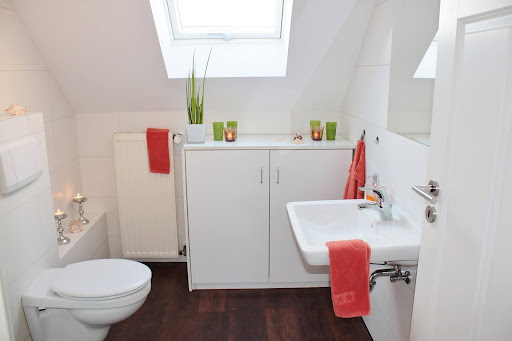
A wall mounted hand basin fundamentally changes the dynamics of your bathroom. By eliminating the traditional pedestal or vanity cabinet, it creates an airy, open environment that makes even compact HDB bathrooms feel significantly larger. The clear floor space underneath not only enhances this sense of volume but also simplifies cleaning. Without corners to navigate around, mopping becomes a swift, single motion. This design choice speaks to a minimalist, modern sensibility, prioritising clean lines and uncluttered surfaces. The visual lightness of a wall mounted wash basin can make it an ideal centrepiece for a bathroom designed with tranquility and order in mind.
A Guide to Wall-Mounted Basin Types and Their Perfect Fit
Not all wall-hung basins serve the same purpose or suit every space. Understanding the distinctions will guide you to the perfect match for your bathroom’s layout and your personal style.
Wall-Hung Countertop Basins: These models rest elegantly on top of a wall-mounted shelf or console. They offer a bold, designer look that makes a strong style statement. The installation requires a precise and sturdy support structure, but the result is a luxurious, furniture-like feel. This type works wonderfully when you desire a surface to display toiletries or a small decorative item.
Semi-Recessed Wall-Mounted Basins: A smart hybrid, the semi-recessed basin projects partially from the wall, allowing for a shallower cabinet or shelf beneath. This design is a masterstroke for very narrow bathrooms where a fully recessed cabinet might not be feasible. It provides some storage or a useful surface while maintaining the floating effect characteristic of a wall mounted basin.
Full Recessed Wall-Mounted Basins: Designed to be installed within a wall cavity or a custom-built vanity, these basins present a completely flush and integrated appearance. They offer a supremely tidy and streamlined look, with all plumbing neatly concealed behind the wall. This option demands careful planning during the rough-in stage but delivers an unparalleled minimalist finish.
Corner Wall-Mounted Basins: For maximising space in exceptionally small or awkwardly shaped bathrooms, the corner wall mounted basin is a genius solution. It tucks neatly into an unused corner, freeing up the rest of the room. This efficient use of space makes it a popular choice for powder rooms or en-suite bathrooms in older HDB flats.
Summary of Wall-Mounted Basin Types
| Basin Type | Best For | Key Characteristics |
|---|---|---|
| Wall-Hung Countertop | Style-focused bathrooms, statement pieces. | Sits on a console or shelf; requires strong wall support; bold, designer aesthetic. Ideal for modern homes where visual impact matters. |
| Semi-Recessed | Narrow spaces, need for some surface area. | Partially protrudes from the wall; allows for a shallow shelf or cabinet underneath. Balances space-saving with usability. |
| Full Recessed | Ultra-minimalist, integrated looks. | Fits flush within a wall or vanity; plumbing fully hidden; delivers a seamless, high-end finish. Requires pre-planning during renovation. |
| Corner | Small HDB toilets, powder rooms, space maximisation. | Installs into a corner; highly space-efficient; ideal for compact layouts. Makes unused corners functional without sacrificing floor space. |
The Critical Role of the Wall Mounted Basin Fixing Kit
The illusion of effortless floating belies the robust engineering required to hold a basin securely in place. The integrity of the entire installation hinges on a single, non-negotiable component: the wall mounted basin fixing kit. This kit typically includes heavy-duty metal brackets, high-tensile bolts, and often a template for precise marking. A quality wall mounted basin fixing kit is engineered to distribute the weight of the basin, the water, and the pressure of daily use directly into the wall studs or, more commonly in HDBs, into properly installed wall anchors designed for substantial load-bearing.
Attempting to mount a basin without a proper, model-specific wall mounted basin fixing kit or with substandard hardware is a recipe for disaster. The risk of the basin becoming loose or, in a worst-case scenario, detaching from the wall is significantly high. For a secure and lasting installation, especially when considering a heavier model like a Kohler wall mounted basin or a wall mounted stainless steel basin, investing in and correctly installing a high-quality fixing kit is paramount.
Selecting the Right Taps: The Wall Mounted Basin Mixer
The tap you choose for your wall-hung basin is as much a stylistic decision as a functional one. A wall mounted basin mixer is a single unit that controls both hot and cold water, and it is mounted directly onto the basin itself or onto the wall above it. The choice between a basin-mounted and a wall-mounted mixer affects the plumbing setup and the final look.
When selecting a wall mounted basin mixer, consider the spout reach and height relative to your basin size to prevent excessive water splashing. The finish—be it chrome, brushed nickel, or matte black—should complement your bathroom’s hardware. For those seeking reliability and refined design, a Grohe wall mounted basin mixer represents a top-tier choice, known for its durability and precision engineering. The market offers a vast array of wall mounted basin taps, so select one that balances aesthetic appeal with practical performance and ease of use.
Installation and Positioning
Installing a wall mounted basin Singapore homeowners will love requires meticulous attention to detail and a strict adherence to HDB’s renovation guidelines. The process is not merely about attaching a fixture to a wall; it involves understanding wall structures, plumbing, and local regulations.
HDB Wall Considerations and Drilling Guidelines
The first and most critical step is to understand what lies behind your bathroom tiles. HDB walls are typically constructed from brick or concrete, and drilling into them requires care. Crucially, HDB forbids the drilling of structural beams and columns. Furthermore, one must be hyper-vigilant to avoid concealed electrical conduits and water pipes within the wall. The HDB renovation guidelines mandate that homeowners use only HDB-approved renovation contractors who carry the necessary insurance. This is not a mere formality; it is an essential measure to protect your property and your neighbours’.
Step-by-Step Guide to Wall-Mounted Basin Installation
| Step | Details |
|---|---|
| Step 1: Plan and Mark the Position | Determine the ideal height and location for your basin, considering user comfort and the existing plumbing points. Use the template from your wall mounted basin fixing kit to mark the drilling points for the brackets accurately. |
| Step 2: Shut Off Water Supply | Locate the main water shut-off valves for your bathroom and turn them off to prevent flooding during the plumbing work. |
| Step 3: Prepare the Wall and Drill | Carefully drill pilot holes at the marked points, using a masonry bit and ensuring the drill is perpendicular to the wall. The depth and diameter of the holes must match the specifications of the wall anchors you are using. |
| Step 4: Install Wall Anchors and Brackets | Insert heavy-duty wall anchors into the drilled holes. These anchors provide the grip needed to support the weight. Securely fasten the wall mounted basin brackets onto the wall using the provided bolts, ensuring they are perfectly level. |
| Step 5: Connect the Plumbing | Before mounting the basin, connect the water supply lines and the waste trap to the basin. This is also the stage to install your chosen wall mounted basin taps or wall mounted basin mixer. |
| Step 6: Mount the Basin | With the help of a second person, carefully lift the basin and guide it onto the installed brackets. Ensure it clicks or locks securely into place. |
| Step 7: Make Final Connections and Test | Connect the water supply lines to the taps and the waste trap to the outlet. Turn the water supply back on and check all connections for leaks. Test the drainage by running water into the basin. |
Need a secure, leak-free wall-mounted basin installation in your HDB flat? FixFirst’s certified plumbers use professional tools and HDB-compliant techniques to ensure your basin is level, stable, and properly sealed
Best Practices for Positioning Your Wall Mounted Hand Basin
The standard height for a wall mounted wash basin, measured from the floor to the top rim, typically falls between 800mm and 900mm. However, this should be adjusted based on the primary users’ height for optimal comfort. Ensure there is sufficient clearance in front of the basin for comfortable use. The placement must also align with the existing waste pipe to avoid complex and problematic plumbing alterations. For a model with a specific footprint, like a Kohler wall mounted basin, always follow the manufacturer’s recommended clearances.
Why Choose a FixFirst Handyman To Install Your Wall-Mounted Basin
While a DIY project can be tempting, the installation of a wall-mounted basin is a task where professional expertise pays dividends in security, compliance, and long-term peace of mind. Here is why FixFirst is the preferred partner for your project:
✔️ Expertise in HDB Regulations: Our handymen are thoroughly familiar with HDB’s renovation guidelines. We ensure all work, especially drilling into walls, is performed in full compliance, protecting you from potential penalties and structural damage.
✔️ Precise and Secure Installation: We understand the critical importance of the wall mounted basin fixing kit. Our professionals use the correct tools and techniques to mount the wall mounted basin brackets securely, guaranteeing your basin is safely supported for years to come.
✔️ Integrated Plumbing and Electrical Knowledge: FixFirst offers a unique advantage with our combined expertise in plumbing and electrical work. We can handle not just the basin installation but also any necessary adjustments to water lines, waste traps, or even nearby lighting and sockets.
✔️ Problem-Solving for Older HDBs: We have extensive experience working with the unique challenges presented by older HDB flats, from managing asbestos concerns to navigating complex existing plumbing.
✔️ Time and Cost Efficiency: What might take a novice an entire weekend, our skilled team can complete efficiently and correctly in a few hours, saving you time, frustration, and the potential cost of fixing a botched DIY job.

Frequently Asked Questions (FAQs) on Wall Mounted Basins in Singapore
Yes, they are highly suitable, especially for creating a sense of space. However, the wall must be structurally sound enough to support the weight. A professional can assess your specific wall condition.
The weight capacity depends on the wall type, the quality of the wall mounted basin brackets, and the installation. A properly installed basin using a good wall mounted basin fixing kit can easily support the basin, water, and reasonable downward pressure.
Yes, it is standard to install them on tiled walls. The drilling must be done carefully to prevent the tiles from cracking, which is best left to a professional with the right tools.
The cost varies based on the complexity, the need for plumbing alterations, and the professional you hire. It is best to get a detailed quotation from a trusted service provider like FixFirst.
The primary advantage is easy cleaning. The open floor space allows you to mop freely underneath, and you can wipe behind the basin without obstruction.
A wall-mounted mixer is installed on the wall above the basin, while a deck-mounted one is installed directly on the basin itself. A wall-mounted option offers a cleaner look but requires precise plumbing during the rough-in stage.
The basin itself can be similarly priced, but the total cost may be higher due to the need for a specialized wall mounted basin fixing kit and potentially more complex installation work.
Absolutely. You can install a floating shelf or a shallow wall-mounted cabinet beneath the basin. Alternatively, choose a model that integrates with a vanity, like a semi-recessed wall mounted hand basin.
A professional handyman can perform a thorough assessment of your wall’s material and condition to determine its load-bearing capacity and recommend the appropriate support method.
You should stop using it immediately and contact a professional plumber or handyman. They will need to inspect the wall mounted basin brackets and the wall anchors to rectify the issue safely.
The journey to incorporating a sleek and space-enhancing wall mounted basin Singapore style into your home is one of deliberate choice and precise execution. From selecting the right type and a reliable wall mounted basin mixer to ensuring a secure installation with the correct wall mounted basin fixing kit, every detail contributes to the final outcome. While the aesthetic and functional benefits are clear, the installation process demands a level of skill and knowledge that ensures safety, compliance, and longevity. Do not leave this critical task to chance. Contact FixFirst today for a professional consultation and let our expert handymen deliver a flawless installation that combines beauty, function, and peace of mind.