Mounting tapes have quietly reshaped how we organize and decorate our living spaces in Singapore. For residents of HDB flats and condominiums, where drilling into walls often requires permission and can compromise tile integrity, these adhesive solutions offer a liberating alternative. They empower us to personalize our homes with artwork, mirrors, and functional fixtures, transforming blank walls into reflections of our style without the permanence of nails or the necessity of power tools. This guide delves deep into the world of mounting tapes, providing a thorough, research-backed resource for selecting, applying, and removing these modern marvels to keep your walls pristine.

Understanding the Purpose and Mechanics of Mounting Tapes
Mounting tapes are more than just sticky backings; they are engineered adhesive systems designed to create a powerful, long-lasting bond between an object and a surface. Unlike traditional tapes, they often feature a dual-component design: a high-strength adhesive layer and a closed-cell foam core. This foam allows the tape to conform to microscopic imperfections on both surfaces, creating maximum contact area. It also provides shock absorption, which is vital for holding weight and resisting shear forces. The primary purpose is to offer a clean, reversible, and damage-free method of installation, a feature highly valued in Singapore’s rental and public housing markets where wall damage can lead to financial penalties.
A Homeowner’s Guide to Selecting the Right Mounting Tape
Choosing the correct tape is the single most important factor for a successful and safe installation. The wrong choice can lead to fallen items and damaged surfaces.
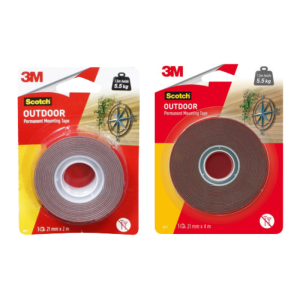
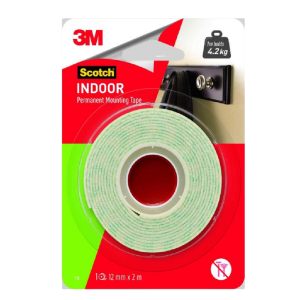
The first consideration is always weight. Manufacturers provide clear weight limits for their products, and these are not suggestions but critical safety guidelines. Exceeding them is a primary reason for failure. For lighter items like photographs, small posters, or lightweight plastic hooks, standard double-sided tapes may suffice. However, for anything of substantial heft, such as mirrors, large frames, or metal hooks, you must seek out a heavy duty wall mounting tape. This variant possesses a much higher tensile strength and a thicker, more aggressive adhesive formulation designed specifically for challenging vertical applications.
Next, assess the surface material. Mounting tapes bond best with smooth, non-porous surfaces like glass, finished metal, laminated wood, and painted walls. Textured, porous, or dusty surfaces like raw brick, rough concrete, or certain wallpapers significantly reduce the tape’s effectiveness. The brand of the tape also matters significantly. A trusted name like 3M wall mounting tape is renowned for its rigorous testing and reliable performance. Their range, including specific products like 3M wall mounting tabs for smaller items, offers solutions tested for various conditions, including Singapore’s high humidity.
Finally, consider the application. If you are attaching something to a wall and are concerned about potential paint damage, you are likely looking for a wall safe mounting tape. These products are specifically formulated with a less aggressive adhesive that holds securely but is designed to remove cleanly without leaving residue or pulling off paint.
Mounting Tape Applications: Transforming Singaporean Interiors
The versatility of mounting tapes unlocks a multitude of uses in the typical HDB home. They are the secret behind countless clutter-free and beautifully decorated spaces. In the living room, they secure large canvas prints and photo galleries to feature walls without a single drill hole. In the kitchen, they hold up knife strips, paper towel holders, and even under-cabinet lighting systems, adhering firmly to tiled backsplashes. Bathrooms benefit from mounted soap dispensers, toothbrush holders, and shower caddies, all affixed with tapes designed to resist steam and moisture. Even on doors and in wardrobes, tapes secure hooks for robes, bags, and belts. This technology allows for a dynamic living environment where layouts and decorations can evolve without being constrained by the permanence of hardware fixtures.
The Definitive Step-by-Step Guide to Application
A successful bond depends entirely on proper preparation and application. Rushing this process will almost certainly lead to failure.
| Step | Details |
|---|---|
| Step 1: Surface Preparation | This is the most overlooked yet critical step. Both the object and the wall must be impeccably clean, completely dry, and entirely free of dust, oil, or grease. Use a cloth dampened with isopropyl alcohol to wipe both surfaces thoroughly and allow them to dry completely. |
| Step 2: Measure and Mark with Precision | Decide on the exact placement of your object. Use a tape measure and a pencil to make light, accurate marks on the wall. Employ a spirit level to ensure your markings are perfectly horizontal or vertical. |
| Step 3: Cut and Apply the Tape | Cut the required number of tape strips. For larger items, use multiple strips distributed near the corners and the center to evenly distribute the weight. Remove one side of the liner and press the tape firmly onto the clean, dry back of the object you are hanging. |
| Step 4: Position and Secure the Object | Remove the remaining liner from the tape strips. Carefully align the object with your markings on the wall. The moment of contact is crucial; once the tape touches the wall, you cannot reposition it. Firmly press the entire object against the wall for at least 30 seconds, applying strong, even pressure across the entire surface. |
| Step 5: The Crucial Curing Period | This is the second most overlooked step. While the tape will stick immediately, it requires time to develop its full bond strength. Follow the manufacturer’s instructions, but as a general rule, avoid putting any stress or weight on the object for a minimum of 24 hours. Some heavy duty wall mounting tape products may recommend up to 72 hours for maximum strength. |
Need a secure, no-drill mounting solution in your HDB flat? FixFirst’s certified handymen know when to use tape and when a drill is safer. We help you hang items right
Achieving Perfect Positioning and Avoiding Common Pitfalls
The adhesive strength of mounting tape is a double-edged sword. Its permanence means there is zero room for error in positioning. A mistake made during application is difficult to rectify without potentially damaging the wall or the object. To circumvent this, employ a clever trick: use a piece of masking tape to mark the top corners of your object’s intended position on the wall. Before applying the tape to your object, you can hold it up against these markers to visually confirm the placement is perfect.
The main issue during setup is underestimating the required preparation. Applying tape to a slightly dusty or damp surface will result in a weak bond that will fail over time, often without warning. Furthermore, environmental factors play a role. Applying tape in a cool, air-conditioned room and then exposing it to the heat and humidity of a non-air-conditioned space can cause expansion and contraction, weakening the bond. Always apply tape in the same environmental conditions in which it will exist permanently.
The Art of Safe and Effective Removal
The question of how to remove mounting tape from wall surfaces is one of the most common queries from Singaporean homeowners. The fear of damaging paint is valid, but with the right technique, removal can be clean and simple.
The universal first step for how to remove mounting tape from painted wall is to use heat. Gently warm the tape and the adhesive with a hairdryer on a medium setting. Do not overheat or hold it too close, as this can damage the paint or bubble the tape. The heat softens the adhesive, making it more pliable. Once warm, slowly and carefully pull the tape back parallel to the wall, not away from it. If the tape begins to stretch or tear, apply more heat.
If the tape itself comes off but leaves a sticky residue, a small amount of isopropyl alcohol or a commercial adhesive remover (tested on an inconspicuous spot first) can dissolve it. Apply the liquid to a cloth and dab at the residue until it breaks down, then wipe clean. For those concerned about does Scotch mounting tape damage walls, the answer is that when removed correctly using the methods described, it should not. However, improper removal or use on fragile or poorly prepared surfaces can indeed lead to paint damage.
Summary of Mounting Tape Use Cases
| Application Scenario | Recommended Tape Type | Key Consideration |
|---|---|---|
| Lightweight Frames/Photos | Standard Double-Sided Tape | Weight must be under 1kg; ensure surface is smooth. |
| Mirrors, Canvases, Hooks | Heavy Duty Wall Mounting Tape | Critical to follow weight limits and curing time. |
| Temporary / Rental-Friendly | Wall Safe Mounting Tape | Designed for easier, cleaner removal. |
| Kitchens & Bathrooms | Moisture-Resistant Mounting Tape | Check packaging for resistance to humidity and steam. |
| Small DIY Projects & Crafts | 3M Wall Mounting Tabs | Perfect for precise, small-scale applications. |
Need help choosing the right no-drill solution for your HDB flat? FixFirst’s certified handymen know which tapes work—and when a drill is safer. We help you hang it right without damaging your walls

Frequently Asked Questions (FAQs)
Weight capacity varies dramatically by product. Standard tapes may hold up to 1 kg, while heavy duty wall mounting tape can support 5 kg or more per strip. Always check the manufacturer’s specifications on the packaging.
It is not recommended. Textured walls have a reduced surface area for the adhesive to bond to, significantly weakening the hold and increasing the chance of failure.
The most common reasons are: exceeding the weight limit, improper surface cleaning (dust or grease), insufficient pressure during application, not allowing the full curing time, or applying it to an unsuitable surface.
When applied correctly to a suitable surface, high-quality mounting tape can last for several years indoors. Outdoor longevity is reduced due to UV exposure and weather elements.
No, the adhesive is designed for a single application. Once compressed and bonded, it loses its integrity and will not form a secure bond again.
It is generally safe for standard painted drywall, plaster, tile, glass, and finished wood. It is not suitable for raw brick, concrete, or walls with loose, flaking paint or wallpaper.
Poster putty is a moldable, reusable adhesive for extremely lightweight items like posters and paper. Mounting tape is a permanent, high-strength adhesive foam tape for heavier, more permanent installations.
It can if not removed properly. Use a wall safe mounting tape variant and always follow the removal process involving heat and slow, careful peeling
Yes, but only if you select a tape explicitly rated for outdoor use. These are designed to withstand temperature fluctuations, rain, and UV radiation.
Use a small amount of isopropyl alcohol or a citrus-based adhesive remover on a clean cloth. Gently dab the residue until it dissolves, then wipe away. Always test cleaners in a hidden area first.
The process is the same as for a painted wall. Tiles are typically very resilient, making it easier to use a plastic scraper to gently lift an edge after applying heat.
Silicone is a very low-energy surface, making adhesion difficult. Specialized tapes exist for such applications, but standard mounting tapes will likely not hold well.
Yes. Ideally, apply tape in a room-temperature environment. Very cold conditions can make the adhesive too stiff, and very hot conditions can make it too soft before application.
Mounting tapes represent a fundamental shift in home furnishing, offering Singaporeans unparalleled flexibility to define their spaces without conflict with HDB guidelines or concerns over permanent damage. The key to success lies in mindful selection, meticulous application, and patient removal. By understanding the science behind the adhesive and respecting its parameters, you can confidently secure your belongings and express your creativity. Embrace this powerful tool to curate a home that is both beautifully personalized and perfectly preserved.
Explore our curated selection of reliable mounting solutions and expert advice at FixFirst. For those tricky installations, our professional handyman services are just a click away to ensure your decorations stay up and your walls stay perfect.