The rhythmic thud of a heavy bag, the solid connection of a glove on leather—it’s a symphony of fitness that many wish to bring into their personal space. In Singapore, where floor space is a premium and freestanding bag stands can dominate a room, the appeal of a wall-mounted punching or boxing bag is undeniable. However, the journey from purchasing a kit to safely enjoying your workouts is fraught with structural considerations and physical demands. This extensive guide dissects the entire process of a heavy bag wall mount DIY project, examining the types available, the profound challenges of Singaporean buildings, and the meticulous steps required to ensure your installation is unshakably secure.
Why Choose a Wall Mount for Your Heavy Bag?
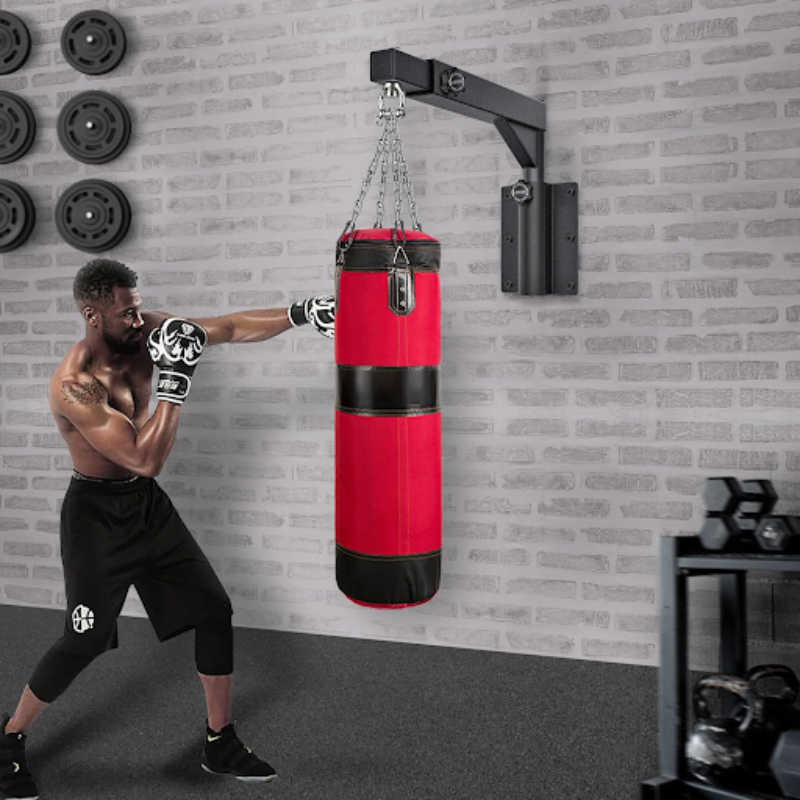
Wall mounts present a compelling alternative to traditional stands, primarily through their space-saving design. They reclaim the valuable floor area that a stand would occupy, creating a more open and versatile training zone. This is a significant advantage in compact HDB bedrooms, multi-purpose halls, or private gyms where every square meter counts. Furthermore, a well-anchored wall mount typically offers a sturdier, more rigid platform than many freestanding models, which can shift or wobble during intense combinations. This stability provides a more consistent and professional training experience, mimicking the feel of a gym-grade installation.
The Anatomy of a Heavy Bag Wall Mount
A heavy bag wall mount is not a simple bracket; it is an engineered system designed to manage dynamic, multi-directional forces. The core component is a steel mounting arm, often constructed from thick, cold-rolled steel, which extends the bag away from the wall to allow for free movement. This arm connects to a large, reinforced wall plate. The size and design of this plate are critical, as it distributes the immense stress across a wider section of the wall. High-quality mounts include a swivel mechanism between the arm and the bag hook, permitting the bag to rotate naturally with hooks and spins, preventing the chains from twisting unduly. The entire apparatus is typically finished with a corrosion-resistant coating, a vital feature for withstanding Singapore’s humidity and the perspiration from workouts.
Critical Considerations Before Your Heavy Bag Wall Mount DIY Project
Embarking on a heavy bag wall mount DIY endeavor without proper forethought is the most common path to failure. The single most important factor is the wall itself. In HDB flats and many older Singaporean buildings, not all walls are created equal. Partition walls, often made of hollow bricks or aerated concrete blocks, are entirely unsuitable. They lack the density and internal structure to handle the repetitive, shock-loaded forces a heavy bag generates.
You must locate a primary structural wall, typically made of reinforced concrete. How can you tell? A solid concrete wall will produce a dull, solid sound when you knock on it, unlike the hollow echo of a partition. Furthermore, you must be acutely aware of what lies behind the wall. Drilling into electrical conduits or water pipes concealed within the concrete can lead to catastrophic and costly damage. Using a high-quality stud and wire detector is not a suggestion; it is a mandatory step for any responsible heavy bag wall mount DIY plan. Finally, consider the noise and vibration transmission. The powerful impacts will travel through the building’s structure, potentially disturbing neighbors in adjacent units or those below you—a significant concern in densely packed HDB estates.
Types of Heavy Bag Wall Mounts Available in Singapore
The Singaporean market offers a few distinct types of mounts, each with specific advantages.
The most common is the fixed arm mount. This design is straightforward: a solid, unmoving arm that holds the bag at a set distance. Its simplicity often translates to greater strength and lower cost, making it a popular choice for those who want a no-frills, dependable setup.
For a more dynamic training experience, a swing arm mount, or a mount with a pivoting joint, is available. This allows the bag to be swung inward or outward, changing its position relative to the wall. This can be useful for varying workouts or for stowing the bag closer to the wall when not in use to save space.
For the ultimate in space conservation, a folding heavy bag mount is an option. These systems incorporate heavy-duty hinges that allow the entire assembly to fold flat against the wall. This is ideal for rooms that need to serve multiple purposes, such as a bedroom that transforms into a gym and then back again. Regardless of the type, the principles of a secure installation remain important.
The Step-by-Step Guide to a Secure Heavy Bag Wall Mount DIY Installation
A successful installation demands patience, the right tools, and unwavering attention to detail.
| Step | Details |
|---|---|
| Step 1: Identify and Verify the Wall | Confirm you are drilling into a solid, load-bearing concrete wall. Use a stud and wire detector to meticulously scan the intended installation area for any hidden hazards. |
| Step 2: Mark the Drill Points | Hold the mount’s wall plate firmly against the wall in the desired position. Use a spirit level to ensure it is perfectly horizontal. Then, mark the positions for the anchor holes through the plate onto the wall with a pencil or marker. |
| Step 3: Select and Drill Pilot Holes | Choose high-tensile strength concrete anchor bolts, typically M12 or larger, with a length sufficient to penetrate deep into the concrete. Select a carbide-tipped masonry drill bit that matches the specified diameter for your anchors. Drill the holes to the exact depth required, using a tape measure on your drill bit to avoid going too deep or too shallow. For HDB concrete walls, use a hammer drill and proper safety gear. |
| Step 4: Clear the Holes | Remove the drill from the hole and use a vacuum or a blast of air to remove all concrete dust from the hole. This ensures the anchors can seat properly and achieve maximum holding power. |
| Step 5: Attach the Wall Plate | Position the wall plate over the cleaned holes. Insert the anchor bolts through the plate and into the holes. Tighten the bolts gradually and alternately, in a criss-cross pattern, to apply even pressure. Continue tightening until the plate is immovably fixed flush against the wall. |
| Step 6: Assemble the Mounting Arm | Following the manufacturer’s instructions, attach the mounting arm, swivel, and any other components to the wall plate. Ensure all bolts and locking pins are securely fastened. |
| Step 7: Hang the Heavy Bag | With the help of at least one other person, carefully lift your heavy bag and connect its chain or strap to the mounting hook. Double-check that the connection is secure before releasing the weight. |
Need a secure, damage-free heavy bag wall mount installation in your HDB flat? FixFirst’s certified handymen use professional tools and HDB-compliant techniques to ensure your mount is level, stable, and safe.
Common Pitfalls and How To Sidestep Them
The allure of a quick heavy bag wall mount DIY project can lead to costly oversights. The most dangerous error is mounting to an insufficient wall. The dynamic load of a punching bag—the force from it swinging and being struck—is many times greater than its static weight. A wall that seems sturdy for a shelf will fail under this kind of stress.
Another frequent mistake is using undersized or inappropriate anchors. Standard plastic wall plugs or small screws are completely inadequate. Only high-grade, deep-penetration chemical anchors or mechanical expansion bolts designed for concrete should be considered. Neglecting to check the tightness of all bolts on a regular schedule is another common failure point. The constant vibration from use will work nuts and bolts loose over time, requiring periodic re-tightening to maintain safety.

Frequently Asked Questions (FAQs)
Capacities vary, but quality mounts generally support between 150 to 250 pounds (70 to 115 kg). Always choose a mount with a capacity that exceeds the weight of your bag and any added water or sand.
You can, but only if it is a certified structural concrete wall. Most internal bedroom walls in HDBs are non-structural partitions and are dangerously inadequate. You must verify the wall type and consider the noise impact on neighbors.
You will need a high-torque hammer drill, carbide-tipped masonry bits, the correct-sized wrench or socket set, a spirit level, a stud/wire detector, a vacuum, and safety goggles.
Mounting arms typically extend 24 to 36 inches (60 to 90 cm). This provides enough clearance for the bag to swing without hitting the wall during use.
Yes, it is very likely. The impact forces travel through the building’s structure. Placing anti-vibration mats under your training area and avoiding very early morning or late night sessions can help manage this.
For overhead concrete installations, wedge anchors or chemical anchors are the most reliable. Their holding power is exceptional when installed correctly in solid concrete.
Some minor noise can be expected, but persistent, loud creaking often indicates that something is not fully tight. Check all the bolts connecting the arm to the wall plate and the swivel mechanism. It could also be the sound of the chains or straps.
While solid brick is stronger than a hollow partition, it is still brittle and can crack under the repeated shock loads. A reinforced concrete structural wall is always the recommended and safest choice.
Perform a thorough check of all bolts and connections after the first few uses, as they will likely settle. After that, a monthly inspection is a good practice for ongoing safety.
Absolutely. A professional brings expertise in identifying the correct structural elements, uses industrial-grade anchors, and ensures the installation can withstand the long-term dynamic loads. This mitigates the risk of property damage or personal injury, making it a wise investment for peace of mind.
Transforming a corner of your Singapore home into a personal boxing gym is an exciting prospect, but the margin for error with a heavy bag installation is slim. The consequences of a failure are not just a disrupted workout, but significant damage to your property and a serious safety hazard. Understanding the formidable forces at play, respecting the limitations of your building’s construction, and executing the installation with precision are the cornerstones of a successful project. A well-executed heavy bag wall mount DIY can be deeply satisfying, but the complexities of HDB structures and the demands of dynamic loading mean that professional involvement is often the most prudent path.
Don’t gamble with the structural integrity of your home or your safety. Let the experienced technicians at Fixfirst handle your installation, guaranteeing an unshakable foundation for your fitness goals. Contact us today for a professional assessment and a quote for a secure, worry-free heavy bag installation.