The Singaporean kitchen, particularly within the space-conscious confines of an HDB flat, demands a masterful approach to organization. Counter space is a prized commodity, and kitchen cabinet real estate is often deep and inconvenient. In this environment, the wall-mounted spice rack emerges as an essential tool for culinary efficiency.
The traditional method of storing spices in a crowded drawer or a dark cabinet leads to a frustrating cycle of searching, knocking over bottles, and forgetting what you own. Wall-mounted storage solves these problems decisively. It brings your entire collection into clear view, making identification instantaneous and access effortless. This visibility encourages use, reduces duplicate purchases, and keeps your cooking area tidy. For the HDB kitchen, where every square inch is meticulously planned, using vertical wall space is perhaps the most intelligent method to expand functionality without any physical renovation.
By moving your spice collection onto the wall, you reclaim valuable workspace, transform cooking into a more fluid experience, and add an element of personal style to your kitchen’s aesthetic. This definitive guide explores every consideration for selecting, installing, and enjoying a wall-mounted spice rack, specifically tailored for the Singaporean homeowner.

Types of Wall-Mounted Spice Racks
The market offers a diverse array of designs, each catering to different storage needs, aesthetic preferences, and spatial constraints. Understanding these options is the first step toward finding your perfect match.
Basic Wall Mounted Spice Rack
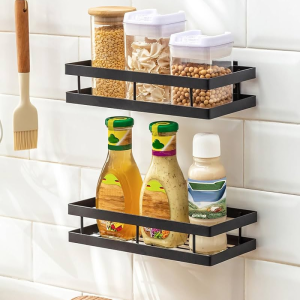
The most common design, a simple wall mounted spice rack, typically consists of a frame with several tiers or shelves, often constructed from metal, wood, or sturdy plastic. These racks hold standard spice jars and bottles in a stepped or cascading arrangement, ensuring every label remains visible. Their open design offers maximum accessibility and makes cleaning a straightforward process. They are ideal for home cooks who value simplicity and quick access above all else.
The Enclosed Wall Mounted Spice Cabinet
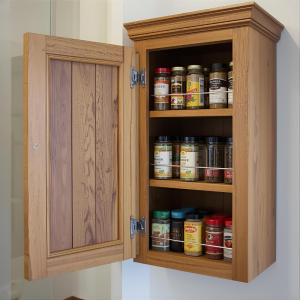
For those who prefer a tidier look that protects spices from grease, steam, and dust, the wall mounted spice cabinet presents an excellent solution. This type functions like a miniature cupboard, featuring a solid door that conceals the spices within. It offers a uniform, streamlined appearance that can blend seamlessly with kitchen cabinetry. This design is superior for maintaining a minimalist aesthetic and for protecting spice integrity in kitchens that generate a lot of airborne oil or moisture.
The Elegant Wall Mounted Spice Cabinet Glass Door
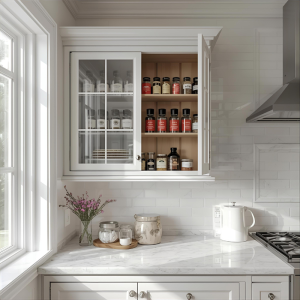
Blending the visibility of an open rack with the protection of a closed cabinet, the wall mounted spice cabinet glass front version is a popular compromise. The glass door, often tempered for safety, shields contents from splatters and dust while still allowing you to see your entire collection at a glance. It adds a touch of elegance and modernity to the kitchen and is particularly effective in preventing spices from fading in direct sunlight if placed appropriately.
Magnetic and Rail Systems
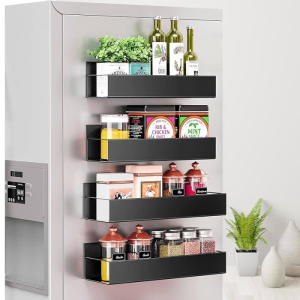
Moving beyond traditional racks, magnetic systems involve attaching metal tins directly to a magnetic board mounted on the wall. Rail systems use tracks with compatible hooks and shelves that can be adjusted and customized. These options offer tremendous flexibility and a distinctly contemporary, industrial charm, allowing you to rearrange your layout as your collection evolves.
The Singaporean Buyer's Guide to Spice Racks
Selecting the right rack involves balancing practical concerns with aesthetic desires. Several factors demand careful thought before making a purchase.
📌Material and Build Quality: The rack must be constructed from a material that can withstand the kitchen environment. Stainless steel offers rust resistance and easy cleaning, while solid wood provides warmth but requires more maintenance. Plastics should be high-quality and BPA-free. Inspect the finish; a good powder coat or paint will resist chipping and grease stains.
📌Capacity and Adjustability: Tally your current spice jars and consider future additions. Does the rack hold enough? More importantly, can it accommodate jars of different heights and diameters? Look for racks with adjustable shelves or tiers, as this flexibility allows you to customize the space for unusually tall bottles or small tins.
📌Aesthetic Cohesion: Your spice rack will be a visible feature. Its design, color, and material should complement your kitchen’s existing style. A stainless steel rail system suits a modern kitchen, while a wooden wall mounted spice cabinet might better fit a classic or Scandinavian design scheme.
📌Ease of Access and Cleaning: An overly deep shelf might hide jars at the back. A stepped design is superior for visibility. Consider how easy it will be to wipe down; open racks are simpler to clean than cabinets with multiple surfaces, though glass doors offer a good balance.
Positioning and Mounting
A spice rack’s utility is wholly dependent on its placement and the security of its installation. A poorly positioned or loosely mounted rack becomes a daily annoyance and a potential hazard.
Identifying the Perfect Location
The golden rule of positioning is to install the rack within an arm’s reach of your primary cooking and preparation area. The ideal spot is often on the wall adjacent to your stovetop or on the side of a kitchen cabinet or fridge panel, provided it can support the weight. However, careful consideration must be given to proximity to heat sources and moisture. Placing a rack directly above an active stove exposes spices and the rack itself to steam, grease, and heat, which can degrade spice quality and create a sticky residue on jars and surfaces. A spot slightly offset from direct heat is preferable.
Navigating HDB Wall Constraints
The walls in HDB homes can be a complex mix of materials, including reinforced concrete, plaster, and tiles. Drilling into these surfaces requires knowledge and the right tools. Crucially, HDB guidelines must be respected to avoid damaging structural elements or concealed utilities like electrical wiring and plumbing. A reckless drilling attempt on a tiled wall can lead to expensive cracks, while drilling into concrete requires a powerful drill and a masonry bit. Understanding what lies beneath the surface is the most critical part of the installation process.
A Methodical Step-by-Step Mounting Guide
For the confident DIYer, adhering to a meticulous process is key to a successful installation.
| Step | Details |
|---|---|
| Step 1: Mark the Mounting Holes | Hold the rack against the wall in your desired location and use a pencil to mark the exact positions of the mounting holes. |
| Step 2: Locate a Stud or Use Anchors | Use a high-quality stud finder to scan the wall where you marked the holes. Locating a wooden stud behind the drywall provides the strongest possible anchor. If no stud is present, you must select heavy-duty wall anchors rated for the rack’s fully loaded weight. |
| Step 3: Choose the Correct Drill Bit | Based on your wall type, choose the correct drill bit. For tiles, a specialized carbide or diamond-tipped bit is essential to prevent shattering. For concrete, a masonry bit is required. |
| Step 4: Drill Pilot Holes | Drill pilot holes at your marked points. Apply steady, firm pressure and avoid using a hammering action on tiles. |
| Step 5: Insert Wall Anchors | Gently tap your plastic wall anchors into the pilot holes until they are flush with the wall surface. For heavier racks, use metal sleeve anchors. |
| Step 6: Secure the Rack | Align the rack’s mounting holes with the anchors or stud. Insert the screws and tighten them until the rack is firmly secured against the wall. Use a spirit level throughout this process to ensure the rack is perfectly horizontal. |
| Step 7: Load and Balance | Once the base is secure, load the rack with your spices, distributing weight evenly to maintain balance. Avoid overloading one side to prevent tipping. |
Need a secure, damage-free spice rack installation in your HDB kitchen? FixFirst’s certified handymen use professional tools and HDB-compliant techniques to ensure your rack is level, stable, and safe
Why Choose a FixFirst Handyman To Install Your Spice Rack
While a DIY project can be appealing, the precision required for a perfect, damage-free installation often justifies professional help. FixFirst handymen bring expertise that guarantees a superior outcome.
✔️Expert Wall Analysis: Our professionals expertly identify stud locations and understand the composition of HDB walls, eliminating the guesswork and risk of drilling into pipes or wires.
✔️Specialist Tool Mastery: We employ powerful drills, specialist tile bits, and professional-grade wall anchors, ensuring a secure mount that lasts, even on challenging tiled or concrete surfaces.
✔️Flawless Placement and Leveling: We make sure your rack is installed perfectly level and at the most ergonomic height.
✔️Zero-Hassle Experience: We manage the entire process, from unpacking to cleanup, saving you time and sparing you the potential frustration of a botched DIY attempt.
✔️Guaranteed Security and Safety: Our installation is reliable. You gain peace of mind knowing your rack and valuable spices are securely mounted and won’t come crashing down.

Frequently Asked Questions (FAQs) about Wall-Mounted Cereal Dispensers in Singapore Homes
This varies by model, but a fully loaded large dispenser can weigh between 3 to 5 kilograms. This is why using appropriate wall anchors or drilling into a stud is non-negotiable for safety.
While most good-quality dispensers have sealing mechanisms at the spout to maintain freshness, they are not completely vacuum-sealed. For maximum freshness, it is still advisable to store cereal in its original inner bag within the dispenser or to consume the contents within a few weeks.
Absolutely. They are excellent for storing and dispensing pasta, rice, lentils, beans, nuts, seeds, candy, and even pet food.
Most units disassemble into a few parts. Typically, you can remove the lid and the dispensing mechanism for washing in warm, soapy water. Always ensure all components are completely dry before reassembling and refilling to prevent moisture buildup.
Using a funnel is the cleanest method. Alternatively, you can roll a piece of stiff paper or cardboard into a chute to guide the cereal from the box into the dispenser’s opening.
It shouldn’t if installed correctly. Using a specialist diamond-tip drill bit, drilling at a slow speed without excessive pressure, and avoiding areas with existing cracks or weaknesses will prevent tile damage. This is a reason many homeowners prefer professional installation.
As long as you keep the dispenser and the surrounding area clean and free of spilled cereal, the risk is no higher than with any other food storage method. Ensure the spout is closed properly after each use.
First, ensure it is not overfilled, as pressure can sometimes cause this. If the problem persists, disassemble the mechanism and check for debris or residue that needs to be cleaned. Avoid forcing it, as this could break the plastic.
A wall-mounted cereal dispenser is more than a mere container; it is a statement of intentional living and smart design. It conquers clutter, simplifies routines, and contributes to a kitchen environment that is both highly functional and visually serene. The journey from selection to installation requires attention to detail, especially within the unique framework of a Singaporean HDB home. By choosing the right type for your needs and ensuring its installation is handled with precision and care, you invest in a solution that delivers daily convenience and satisfaction.
Contact FixFirst today to schedule your professional installation service. Our skilled handymen will ensure your new dispenser is mounted perfectly and safely into your kitchen, letting you enjoy a clutter-free breakfast without a single worry.
Frequently Asked Questions (FAQs) about Wall-Mounted Spice Racks in Singapore Homes
Stainless steel, treated aluminum, or high-quality, moisture-resistant plastics are excellent choices as they resist rust and corrosion. Solid wood is beautiful but may warp in consistently humid conditions unless it has a very durable sealant.
Capacity varies significantly. A small magnetic rack holds a few kilograms, while a large solid wood cabinet filled with glass jars can be quite heavy. Always check the manufacturer’s weight specification and use anchors rated for well above that weight for safety.
Yes, absolutely. It requires a specialist carbide or diamond-tipped drill bit, a variable speed drill set to a slow rotation, and gentle, consistent pressure without hammering. Using a piece of masking tape over the drill point can help prevent the bit from slipping.
A distance of at least 24 to 36 inches is advisable to protect your spices from direct heat, steam, and grease splatter, which can degrade their quality and make the rack dirty.
For open racks, regular dusting and wiping with a damp cloth is sufficient. For cabinets, clean the glass door with a glass cleaner and wipe down the interior shelves periodically. Avoid abrasive cleaners that can scratch surfaces.
Quality magnetic racks use strong neodymium magnets. They are very effective for holding metal tins but require a perfectly flat surface and a strong mount for the board itself. They are not suitable for glass jars.
Look for racks with adjustable shelf heights. Alternatively, you can decant spices into a set of uniform jars that you know will fit the rack, which also creates a more unified and aesthetic look.
Yes, but only if the material is thick enough to hold a screw securely. For cabinet sides, ensure you are screwing into the solid wood frame, not just the thin outer panel. Most refrigerator panels are not designed to support mounted hardware.
A wall-mounted spice rack is a transformative addition to any kitchen. It transcends mere storage to become a statement of efficiency and style, turning daily cooking from a chore into a more enjoyable and streamlined ritual. The journey to finding and installing the perfect rack requires thoughtful selection and precise execution, particularly within the unique context of an HDB home. But do not let the challenges of drilling and mounting deter you from achieving a perfectly organized kitchen.
Entrust your project to the experts at FixFirst. Our skilled handymen will ensure your new wall mounted spice racks for kitchen are installed securely, levelly, and without damage to your walls. Contact us today to schedule your installation and take the first step toward a more orderly and inspired cooking experience.