You walk past your new 65-inch television, and it sits flush against the living room feature wall—clean, modern, a statement piece. But inside that wall, the bolts holding 25 kilograms of screen may already be working loose. In Singapore HDBs, where hollow brick and lightweight concrete panels are the norm, a standard or DIY mounting job often lacks one critical step: TV wall mount reinforcement. Without it, the mount becomes a slow-motion failure waiting to show itself at the worst possible moment.
Most mounting disasters begin silently. The anchors shift by half a millimetre. The bracket develops a barely perceptible tilt. Homeowners only notice the problem when the TV droops forward or, in extreme cases, rips free from the wall entirely, taking chunks of plaster and wiring with it. FixFirst has repaired enough of these incidents across Singapore estates to know one truth: the original installation is rarely the issue. The omission of TV wall mount reinforcement is.

Why Standard Mounting Falls Short in HDB Flats
A freshly drilled hole in an HDB wall tells you very little about what sits behind the paint. Builders use different materials depending on when the block was constructed and which wall you are working on. Older flats feature red brick, which holds plug anchors reasonably well. Newer BTO units use drywall partitioning or autoclaved aerated concrete blocks for internal walls, materials that crumble under concentrated load and offer poor pull-out resistance.
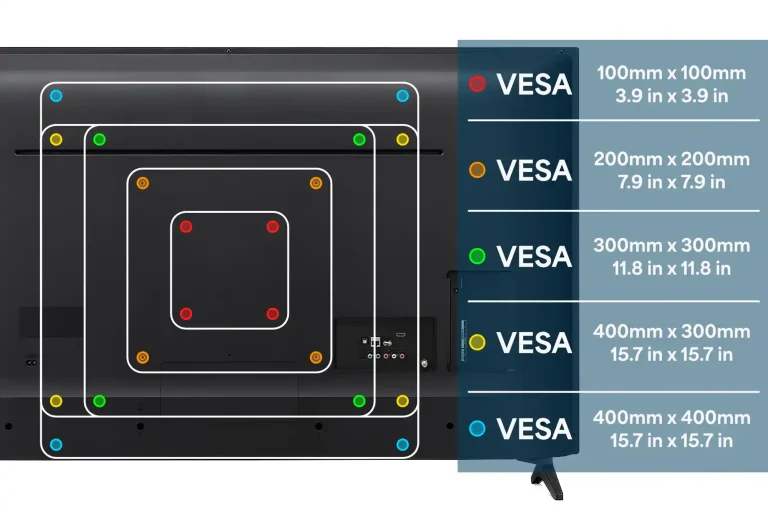
A standard VESA mount installation places all the stress on a handful of fixing points. Each screw bears a shear load every time someone adjusts the TV angle or a child accidentally bumps the bracket. Over months and years, the anchor holes elongate. The screws begin to move inside their plugs. This is not a defect in the mount. It is a material limitation of the substrate. TV wall mount reinforcement addresses exactly this vulnerability by distributing the load beyond the original fixing points.
Signs Your Mount Needs Reinforcement Right Now
Spotting early warning signs can prevent a collapse. Run through this mental checklist each time you dust behind the screen.
First, check the bracket-to-wall connection. Any gap larger than a piece of paper between the mounting plate and the wall surface indicates the bolts have pulled forward. Second, place a spirit level on top of the TV. A drift of more than two degrees from horizontal tells you the anchors on one side have shifted. Third, listen for creaking or clicking noises when you tilt or swivel the screen. Metal fatigue in the bracket arms often produces these sounds. Fourth, look at the drywall immediately around the mount. Hairline cracks radiating outward from the bolt heads mean the wall material itself is beginning to fail.
If you observe any of these four signs, TV wall mount reinforcement should happen within the week. Delaying it turns a solvable structural issue into a full-scale repair job involving replastering, repainting, and rewiring.
The Anchor Problem Nobody Talks About
Singapore hardware shops sell wall plugs by the hundreds, but most are rated for static vertical loads such as shelves and curtain rods. A TV mount introduces a dynamic cantilever load especially when the bracket extends, tilts, or swivels. The outward pulling force multiplies the effective weight several times. A 25-kilogram screen on a fully extended articulating arm can exert over 80 kilograms of pull-out force on the top anchors.
Expansion anchors, which grip by spreading inside the drilled hole, perform poorly in aerated concrete because the material compresses under expansion pressure. Chemical anchor systems—two-part epoxy or polyester resins injected into the hole before the threaded rod—create a bond that spreads load across a much larger surface area. For HDB internal walls made of lightweight blocks, chemical anchoring remains the most reliable foundation for TV wall mount reinforcement. The resin saturates the porous block, hardens, and locks the threaded rod into a solid mass that will not spin or pull free.
Step-by-Step Reinforcement Process
When FixFirst technicians carry out TV wall mount reinforcement in a Singapore home, they follow a sequence refined over numerous service calls. Here is exactly how the reinforcement happens.
- Remove the television and bracket from the wall, inspecting each bolt and anchor point for wear or corrosion. Any bent screw or cracked plug gets discarded immediately.
- Probe the existing holes with an endoscope camera to determine the wall material type and check for hidden conduits or pipes. Skipping this step risks drilling into electrical wiring buried behind the plaster.
- Enlarge the original anchor holes to a clean, dust-free bore sized for chemical anchoring capsules or injection resin. The larger diameter allows the new fixing to engage fresh, undamaged substrate.
- Insert a stainless steel backing plate between the wall and the mounting bracket if the wall condition permits. The plate spans across multiple anchor points and distributes the cantilever load over a wider area, reducing point stress on any single bolt.
- Inject two-part chemical anchor resin into each hole, then insert grade 8.8 or A4 stainless steel threaded rods. The rods must protrude exactly far enough to pass through the mount plate and accept a washer and lock nut, with no excess length that would prevent the bracket from sitting flush.
- Allow full curing time as specified by the chemical anchor manufacturer typically 30 to 90 minutes in our climate, where high humidity can extend the reaction time. No load goes onto the anchors during curing.
- Reattach the mounting bracket and torque each nut to the manufacturer specification using a calibrated wrench. Under-tightening leaves play in the connection; over-tightening crushes the wall material.
- Remount the television and perform a controlled load test by gently applying incremental downward pressure while observing all fixing points. Zero movement confirms the reinforcement has succeeded.
This process transforms a marginal wall fixing into a structural connection that will outlast the television itself.
Material Choices That Matter for Singapore Humidity
Singapore’s constant heat and moisture accelerate corrosion in ways many imported mount kits do not account for. Standard carbon steel bolts with zinc plating look fine on day one but begin rusting inside the wall cavity within two years especially in older flats where walls trap condensation. Stainless steel A4 (grade 316) fasteners resist the chloride and humidity exposure typical of our environment.
Equally important is the bracket material. Powder-coated mild steel brackets can develop rust at the weld points. For long-term TV wall mount reinforcement, solid stainless steel brackets or heavy-gauge steel with marine-grade coating offer far better longevity. The small price difference, often under thirty dollars, buys peace of mind for a decade.
When You Should Call a Professional
Television mounting appears simple on YouTube tutorials, but proper TV wall mount reinforcement requires tools and judgment that come only with experience. A stud finder cannot reliably detect the lightweight steel framing inside HDB drywalls. An amateur with a hammer drill can shatter an aerated concrete block by using the wrong drill speed or hammer setting. Chemical anchors demand precise hole cleaning, which is a step most DIY attempts skip, resulting in bonds that test fine initially but degrade within months.
FixFirst technicians arrive with the full kit: endoscope cameras to map wall internals, chemical anchor dispensers for clean resin application, torque wrenches for accurate tightening, and extensive knowledge of HDB wall construction across every estate from Tampines to Jurong.
Your television is one of the most used and physically exposed installations in your home. It hangs inches above where children play and guests walk. Treating the mount as a one-time setup overlooks the reality that walls age, anchors fatigue, and humidity corrodes. TV wall mount reinforcement is not a repair you schedule after something breaks but the precaution that prevents the break from ever happening. Do not wait for the tilt, the crack, or the crash. Contact FixFirst today, and let a trained Singapore handyman secure your screen.